

How To Copy Layer Effects In Photoshop
Hither are my favorite tips, tricks, and techniques for working with Layer Effects and Layer Styles in Photoshop.
10 Tips for Working with Layer Effects and Layer Styles in Photoshop—This video reveals 10 of my favorite techniques.
Expanding and Collapsing Layer Effects—When Layer Effects are practical to a layer, the effects are displayed in a list under the layer in the Layers console. Depending on how many effects are applied, besides as how many layers have these furnishings, the Layers panel can rapidly go crowded.
• To collapse the Layer Effects stack, in the Layers panel, click the disclosure triangle to the correct of the "fx" icon.
• Option -click (Mac) | Alt -click (Win) the disclosure triangle on the Layers panel to the correct of the "fx" icon to collapse/expand all Layer Effects in the certificate. Note: the first time to yous click, Photoshop volition zoom to the contents of the layer, the second time you use the shortcut, Photoshop will collapse/expand the stacks.
• When adding Layer Furnishings, you can cull to automatically plummet the stack in the Layers panel (in order salve space) by selecting the Layers panel wing-out menu, choosing Panel Options, and unchecking Aggrandize New Effects.
Hide and Show Layer Effects—In the Layer's panel, click the eye icon adjacent to the left of the word Effects to toggle the visibility of all furnishings or, click the eye icon next to a specific upshot to toggle its visibility.
• To use the context sensitive menus, Control -click (Mac) | Right -click (Win) the "fx" icon on the layer with the Layer Issue (in the Layers console) and cull Disable Layer Furnishings.
• To Hide Layer Effects on all Layers Control -click (Mac) | Right -click (Win) the "fx" icon on the layer with the Layer Upshot (in the Layers panel) and choose Hide All Furnishings.
Deleting Layer Effects—In the Layers console, drag the "fx" icon (or the give-and-take Effects) to the trash to delete a Layer Result.
• Drag the proper noun of the Layer Outcome (Stroke, Driblet Shadow etc.) to the trash to delete an private result.
• To apply the context sensitive menus, Control -click(Mac) | Correct -click (Win)) -click the "fx" icon (or on a Layer Effect) and choose ClearLayer Style.
Moving and Duplicating Layer Effects—Yous can apace motility and/or duplicate a Layer Consequence using the Layers panel:
• To move a Layer Effect from one layer to another, drag the "fx" icon (or the word Effects). Choice -drag (Mac) | Alt -drag (Win) to indistinguishable the Layer Effect.
• To move an individual Layer Effect from 1 layer to another, elevate the name of the individual effect (Stroke, Drop Shadow etc.). Option -drag (Mac) | Alt -drag (Win) the name of the result to duplicate the private effect.
Editing Layer Effects/Styles—Double click on a layer Event, the Words Furnishings or the "fx" icon to edit the Layer Upshot.
Saving and Applying Layer Effects to Multiple Layers—This video (Adding Layer Effects/Styles to Multiple Layers) shows three easy to save and add layer Effects/Styles to multiple layers including:
• To re-create and paste, Command -click (Mac) | Right -click (Win) the "fx" icon on the layer with the style (in the Layers panel) and select Copy Layer Style from the context sensitive menu. Then, select the layer(south) that need the layer fashion applied and Control -click (Mac) | Right -click (Win) in the layer (to the right of the proper noun) and select Paste Layer Way.
• To save the Layer Effect to the Styles panel, in the Layer Style dialog, click the "New Fashion" push button or, on the Styles panel, click the plus (+) icon. To utilise the layer Effect drag and drib the Style from the Styles panel onto the layer in the prototype area, drag and drib the Style on the layer in the Layer'south panel, or select a layer(southward) in the Layers panel and click the desired Fashion (in the Styles panel) to utilize the Style to all selected layers.
• To save the Style to a Library, click the plus (+) icon on the Libraries panel and choose Layer Way to add together the Layer Fashion to a Library. When you salve Layer Effects to your Libraries console, not simply can y'all group them in different Libraries which are hands accessible, but you can add additional elements such as logos, text styles, colors, photos and other avails for a specific project or client. Because the contents of a Library is stored in the cloud, you can then access the Layer Manner in Photoshop on whatever machine, in any location, by signing in with your Adobe ID. And yous can share a Library with others by selecting the Invite People or Go Link options from the Libraries console flyout card. To use the Layer Way, select a layer(s), and click on the style in the Libraries panel. This video (Iii Reasons to use the Libraries Panel in Photoshop) walks through the advantages of using Libraries in Photoshop.
Applying Layer Effects to Layer Groups—Layer Effects tin can also be added to Layer Groups. One advantage would be that if you need to brand a change to the Layer Effect, yous merely have to change the Layer Issue that's practical to the Layer Grouping instead of each private layer within the group. And, whatever layer that is added to the Group will automatically have the Layer Outcome applied).
• However, Photoshop treats all of the layers within the group every bit if they are merged before adding the Layer Consequence. In the examples below, you lot tin can see the difference between applying the Layer Consequence to individual layers vs applying it to a Layer Group.
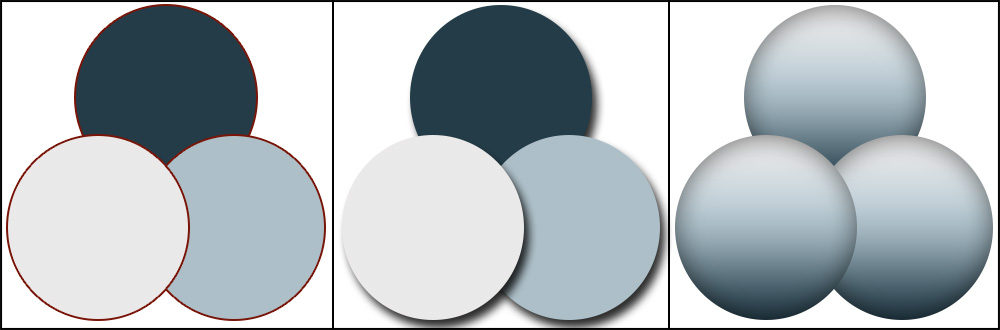
Layer Furnishings added to individual layers (Stroke, Drop Shadow, Gradient Overlay).
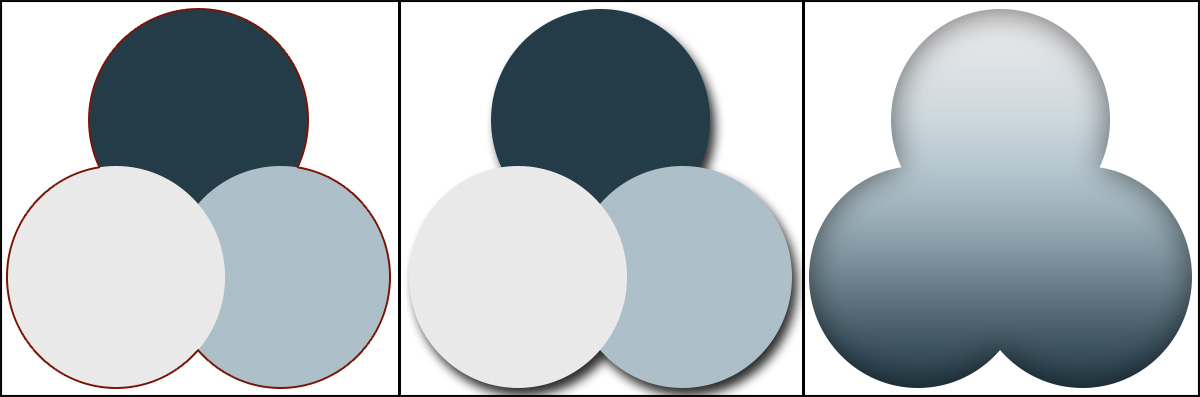
Layer Effects added to the Layer Grouping (Stroke, Drop Shadow, Slope Overlay).
Create Custom Layer Styles Default—In order to customize the default settings for a Layer Mode, select Layer > Layer Style (or click the "fx" icon at the lesser of the Layers panel). In the Layer Way dialog, make the desired changes, and clicking the Make Default push button. At any time yous can return to the Adobe Default settings past clicking the Reset to Default button.
The Order in which Layer Furnishings are Applied—Layer Furnishings are listed in the Layer Mode dialog in the club in which they are applied to the content in the layer. For example, the Drop Shadow consequence is applied (or volition be rendered) below all other Effects, the Bevel and Emboss will rendered on top of any other Effects. This should help when visualizing how multiple effects will exist applied to the contents of a layer or group.
Multiple Instances of a Single Effect—Several effects (Stroke, Inner Shadow, Color Overlay, Gradient Overlay, Design Overlay, and Drib Shadow) can be added multiple times with different settings. In the Layer Way dialog, click the plus (+) icon to the right of the Layer Effects name to add up to 10 additional instances of each effect. Use the upward/down arrows at the bottom of the Layer Manner dialog to alter the stacking social club of the effects (or drag the proper name of the effect in the Layers console).
Setting Custom Global Lighting Defaults—To alter the default Angle and Altitude for the Global Light attribute (which several of the Effects use), starting time close all open documents. So select Layer > Layer Style > Global Calorie-free and make your desired changes. These new setting volition go the default settings for all new documents.
Resizing Layer Effects—Selecting Image > Image Size and changing the size of an image will scale the Layer Effects applied to layers within the prototype (as long equally the Calibration Styles option is checked in the Image Size dialog box), keeping the Layer Effects in proportion to the layers to which they are applied. However, when using Edit > Free Transform to calibration an individual layer that has a Layer Effect practical to information technology, Photoshop will not scale the Layer Effects. For example, if you apply a stroke of 6 pixels on a layer, using Costless transform to scale the image larger or smaller, Photoshop will not change the Layer Effects – the layer will all the same have a stroke of 6 pixels applied.To scale the Layer Effects, do ane of the following:
• Annotation the per centum the layer was scaled using Free Transform and then enter that value in the Layer > Layer Style > Scale Upshot dialog box. This is much easier than changing the values in the Layer Style dialog (especially when multiple furnishings have been applied).
• Or, earlier using Free transform on the layer with the Fashion/Outcome, convert the layer to a Smart Object and so transform.
Converting Layer Furnishings into Layers—To convert a Layer Effect into a raster layer(due south) choose Layer > Rasterize > Layer Way.
Using Layer Furnishings to Create a Transparent Watermark—To hide the text (or whatsoever image data on a layer) but go along the layer effects visible (a driblet shadow for example), decrease the Fill amount on the Layers console. Annotation: decreasing the Opacity amount will decrease the layer information as well as any Layer Styles applied. This video (Creating Transparent Logos for Watermarks and Overlays in Photoshop), demonstrates how to apply the Fill slider on the Layers panel to hide the content on the layer while maintaining the applied layer styles.
Applying Layer Effects to Layers with Masks—When applying Layer Effects to layers with masks (Layer Masks or Vector Masks), choose theBlending Options (in the Layer Way dialog) and enable "Layer Mask Hides Effects"/"Vector Mask Hides Effects" to restrict the Layer Consequence to effect only the visible portion of the layer.
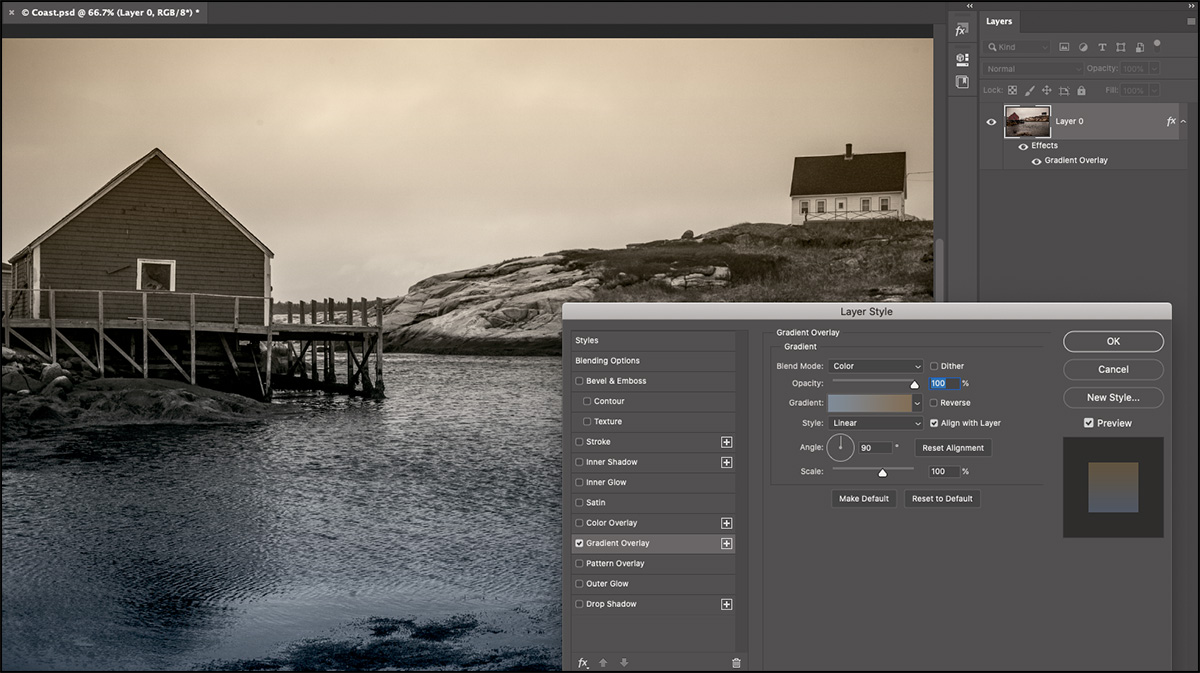
Adding a Color Wash to a Single Layer Using a Layer Effect—To add together a color wash (or colour overlay) to a layer, select the layer and click the "fx" icon at the lesser of the Layers console. In the Layer Fashion dialog, cull Slope Overlay, southwardet the Blend Mode to Colour and choose a gradient preset by clicking on the small down facing triangle to the right of the gradient (or, create your own slope by clicking in the slope area and using the Gradient Editor). Note: the Layer Manner must be practical to a layer, not the Groundwork, to turn the background into a layer, double click the word Background.
Advanced Blending "Knockout" Options—This video (ten Tips for Working with Layer Furnishings and Layer Styles in Photoshop) demonstrates how to use the Layer Effects Knockout options (shallow and deep) to cut a pigsty in a layer and reveal layers below depending on their stacking order.
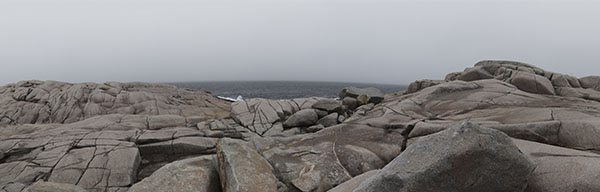
Using the "Blend If" Sliders—The Blend If sliders in the Layer Styles dialog is a very useful way to selectively show and hibernate portions of a layer based the tonality and color of the prototype. In the example below I want to alloy the clouds from the first image into the sky of the second (rocky) image.
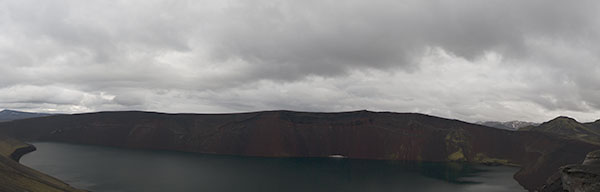
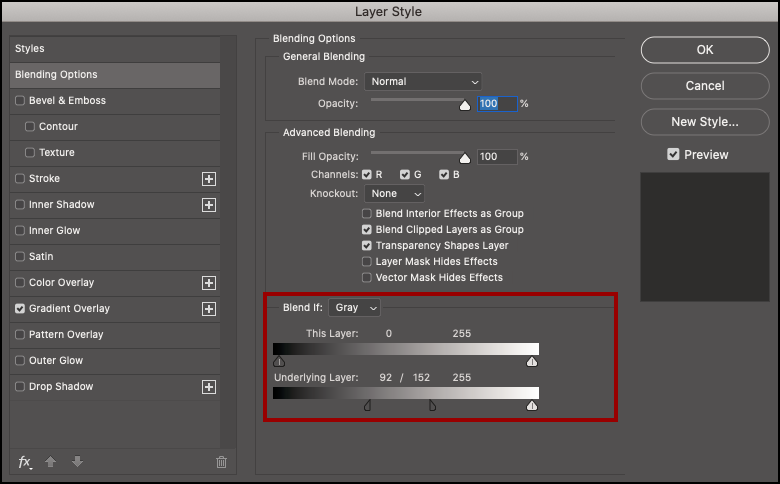
In the Layer Styles dialog, nether Blending Options, I moved the blackness slider for the Underlying Layer to the right to hibernate the nighttime foreground values of the cloud image. In order to create a shine transition, Option + (Mac) | Alt + (Win) click and elevate the blackness triangle to split information technology into ii. The values to the left of the split triangle volition exist completely transparent the values between the separate triangle will transition from transparent to opaque, and the values to the right of the second split triangle will exist fully opaque.
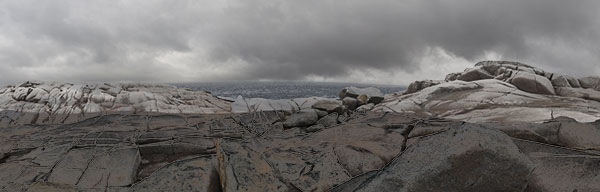
It'southward OK if the rock in the foreground is semi transparent at this indicate – yous want to focus on the "transitional areas" – where the new sky (the clouds) will meet the sea and the top of the rocks.
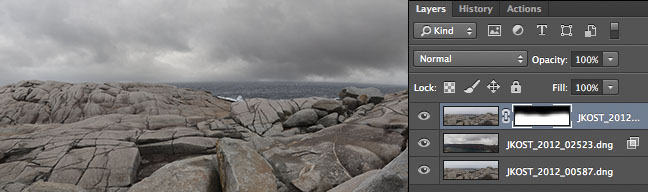
To bring dorsum the solid rocks in the foreground, I made a copy of the stone layer and moved it in a higher place the new heaven (the clouds) layer in the Layers panel. And so, I added a layer mask and painted with black to hide the drab heaven and reveal the clouds below, while keeping the rocks solid.
Because this case has a fairly straightforward horizon to mask, you might experience that I'g making this procedure or technique overly complicated. However, the Alloy if sliders tin be tremendously useful when masking detailed objects such as a tree against a heaven. In fact, y'all can fifty-fifty change the Blend If options to alloy private colour channels.Annotation: If any changes have been made in the Layer Style dialog under the Avant-garde Blending expanse, a new Blending Effects icon is displayed on the layer in the Layers console.
Copyright © 2022 Julieanne Kost.
All rights reserved.

How To Copy Layer Effects In Photoshop,
Source: https://jkost.com/blog/2020/10/working-with-layer-effects-and-layer-styles-in-photoshop.html
Posted by: casanovasland1994.blogspot.com
0 Response to "How To Copy Layer Effects In Photoshop"
Post a Comment